How To Remove A Lori Single Cylinder Deadbolt | Mr. Locksmith™ Northshore
Mr. Locksmith Northshore: (604) 239-2111
How to Remove a Lori Single Cylinder Deadbolt
- Open the door.
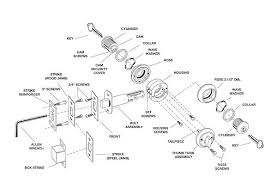
- Remove the deadbolt faceplate from the door edge by removing the two flathead screws using a Phillips screwdriver.
- Remove the thumb latch assembly from the interior side of the door, if applicable, by removing the two screw bolts on either side of the latch handle, then pulling the assembly horizontally from the door.
- Insert the long shaft of a 5/64-inch Allen wrench into the space on either side of the slide bolt to engage in the cylinder set screws and turn the set screw counterclockwise two to three full turns to loosen. Repeat for the set screw on the other side of the slide bolt if it is a double cylinder deadbolt.
- Remove the deadbolt cylinder(s) by turning the cylinders counterclockwise until the cylinder is free of the mortise housing. Insert the deadbolt’s key halfway into the cylinder for leverage in turning the cylinder. Repeat for the opposite side cylinder in double-keyed models
- Remove the slide bolt assembly from the door edge, then remove the cylinder housing from the door hole.
This is a common problem. It’s confusing for locksmiths. It’s the Lori or the Kaba. This is a single-cylinder deadbolt. The lock has key on the outside, thumb turn on the inside. It’s a one-inch bolt. Now, what, and it throws locksmiths. One of the problems is you can put any molten cylinder in this. So, you could slay, say, the customer could say or you’re looking at it, say, “Oh, you have a Schlage deadbolt.” Or I have a quick set or have a Corbin. Because you can put any mortice cylinder. It could be a Medico in here, could be a high-security lock. You will see why when we take this off. But it confuses because, traditionally, you have the thumb-turn. So, the way of seeing this lock, first of all, is, and you could run across the double cylinder deadbolt key on both sides. And we’ll have another video on that.
This is the Lori single-cylinder deadbolt. What usually happens is they remove these two screws. What you have to do, you have to remove this plate, but I will show you what, what you run across right off the bat. So you think, Oh, I got a single cylinder deadbolt. There are my two screws. I just, let’s just remove the screws. So, I remove… the two screws. Take it out. And then, look what you got here. You just go like, oh my goodness. You know, eh, what do I have here? This is a Lori slash Kaba, Ilco. So, it has various names on the boxes. We just call them lorries, single cylinder deadbolt. So, what we have here is a housing. And what’s more important, you cannot nothing comes out from here. What you have to do is you have to take apart, the faceplate on the strike. To remove the cylinder, we have to use a longer Allen key or Allen wrench. We have to go in about that far to get the set screw. So, you need the long one. So, what you do is, take your… Allen key, insert it all the way to the end.
Now, I like it, but you can have it with the bolt outer bolt in. I like it with the bolt in. I’m okay with it like that. And I take my key halfway out and let in. Get it in there. I think I’m in there. And then you go left to loosen. You don’t take it out all the way, just loosen it up. Then, we can, now, we can unscrew. The mortar cylinder. So here’s my mortise lock. And it has an Adam’s rite cam on the back. So, it’s a mortar cylinder with than Adam’s rite cam. So you can see the little set screw, which goes all the way to the back there. So, when you want to re-key it, you can remove the mortar cylinder. So put your space here, your little spring, and those are mortar cylinders. And don’t cross-thread this, just, don’t, never force on this Lori lock or even your Adam’s rites aluminum storefronts. It’s all about the same thing.
So again, we put it. So I think that’s about there, then, right to tighten. We’ll put the set screw back in there. And just finger tight. Take it out. Let’s check it. Make sure we got the length right. If it’s any binding, we either have to go in another turn or out another turn. So, again, pretty simple. It’s confusing for beginners. And if you haven’t run across it for a long time, you, this is how. One way you tell it is by looking down the sides. You’ll see where you have to take your Allen wrench. And you’ll also see, when you take off the inside thumb turn, you see this housing here. And it re-installs pretty, pretty simple. The thumb turn has to be vertical, with the tailpiece in there. Again, we don’t really like these locks. 35 years ago, they were like, wow, this is cool. I can put anything in it. Chest. Test it, test it with the key again. Right here is where the set screw.
You can see it coming out there. So, that’s, basically, what’s holding in the mortar cylinder. Same, similar, very similar to an aluminum storefront. Yeah, there’s the groove. So, our set screw has to lock in there. And, it stops you from screwing the lockout. So, again, any mortar cylinder, these are pretty standard to be a one inch or a 1 1/8″ . And it could be any key way you want. From regular residential, right up to high security and commercial. But, don’t let this fool you. I would not install this lock. We run across them.
There are lots out there. Would I use these? Nope. There is a better solutions. That’s easier to install and more reliable long-term. Sometimes I run across some of the problems I have with this. Sometimes these set screws are rusted in. Whether it seems to rust them up quite a bit. The set screws can be rusted right in. Also, I run across people who have rounded out the set screw because they’ve used the wrong size Allen key, Allen wrench. They’ve, they’ve worn them out. They’ve rounded out the holes. They put him so tight and then they rust in. I’ve seen people use lock tight on these, which you don’t do it. Not a lock I would recommend. But we run across it. The customer has it. We’re gonna re-key it. Throw it back together again. If has got all, any problems, we would just replace it. So, this is the Ilco, Lori, Kaba style deadbolt. It’s mostly called the Lori single cylinder deadbolt. It’s not that difficult to re-key. It’s just that you have to have a long reach Allen wrench. So, not difficult. Hope you enjoyed the video. Good luck when you run across these. It’s not that difficult. It’s just a bit of a pain. Have a good day.
Lori Deadbolt Single Cylinder diagram | Mr. Locksmith Northshore

Lori Single Cylinder Deadbolt | Mr. Locksmith Northshore
How to Remove a Lori Single Cylinder Deadbolt | Mr. Locksmith Northshore
For Locksmith Training, Hands-On Classes and Online Locksmith Training go to Mr. Locksmith Training Website
Mr. Locksmith Northshore: (604) 239-2111
Terry Whin-Yates is a 3rd Generation Locksmith with a BA (Hons) Criminology. He has 35 years of experience in the locksmith and security industry and is a locksmith trainer providing On-LIne and Hands-On locksmith training to people, businesses and Law Enforcement all across North America and Asia. Terry Whin-Yates‘ BC Security License is B4227. http://mrlocksmithtraining.com/about-terry-whin-yates/


 Many locksmiths in the Vancouver/lower mainland area are looking to cut corners and reduce their accountability. Ask your locksmith if they are fully licenced, bonded and insured – like we are.